Friday, April 22, 2011

Easter Treats


Easter was a good excuse for me to make some fun things I hadn't had the chance to try before. It seems I like to add more and more the day before the event!

Started off with Feather-Light Breakfast Puffs from a cookbook I have called Just Like Mom Made. VERY easy to make and they were a hit. Almost like cinnamon rolls.


This was a last minute addition to my desserts for Easter - a Blackberry Custard Torte from Taste of Home. As you can see these are NOT blackberries! I used raspberries and cranberries instead. This was very easy to make!

Too bad not many people ate this - it was yummy and a recipe I would make again!
Showing off my creation.

Graham Cracker and Almond Crust with Cheesecake filling made to look like Egg's nest with coconut and jelly bean toppings. This was the 2nd attempt for these. The first ones the crust didn't do what I wanted and wasn't actually able to make them like nests - more just like flat cookies. Got to thinking I wanted to attempt them again and luckily I had all the ingredients!

I had my little helper here with this dessert...putting the coconut and jelly beans on. It went something like this 1 jelly bean for the dessert, 2 for Trevor, 1 for dessert, 2 for Trevor.
Cake Balls/Pops are all the craze right now. So of course I had to try them. Bakerella has made these famous and they are gorgeous. I am definitely going to have to try my hand at these again because they did NOT turn out how I envisioned. Now it's my mission! You start out with a cake - and I found a wonderful recipe from The Pioneer Woman . I would use this recipe again. The chocolate cake was so soft and came out perfectly from my pans. Too bad I wasn't going to make a cake out of them!


You actually mash the entire cake up!!! Put it in a bowl and mix with the frosting. Mix that all up until it disappears.

Then you roll them into balls. I wanted to make Easter eggs so tried that. Bakerella puts them on cookie sticks and maybe that is why mine didn't work well....But this recipe made 65 balls!! OH MY. Next time I will have to use 1/2 the recipe. Up until now this was pretty easy to do. Lots of steps but not hard. After rolling the balls you stick them in the freezer. Even over night because you want them to be nice and solid before the next step which is to roll them in chocolate.
That was where I went wrong. I've never been to good at dipping in chocolate and this time was no exception. I used every stitch of chocolate I had in my house!!! And they didn't come out very nicely. Too goopy with chocolate....darn it! And it wasn't even easy for me to get the sprinkles on. I had wanted to make colored Easter eggs...but when I tried to add my color to the white chocolate on one batch - it immediately turned hard and wasn't liquid again?!! Huh? Not sure what the heck happened. Any ideas there? So there went my egg colors. But because this made so much we had white, dark and milk chocolate balls. I need to have a tutor help me with these next time!


Here is the platter I took to Easter. My cookies of course were there too!


And let's not forget Snickerdoodles! Dad's favorite and Trevor and I got an itching to bake! Turned out not too bad although I did made the balls a little too big and they expanded more than I thought...oh well.
Trevor was really my helper with these cookies! He's getting more into the baking with me! He cut up the butter for me with his own little knife (a butter knife and don't worry, I was right there making sure he was being safe!)
Then he did a great job of rolling the cookie balls in the cinnamon and sugar mix. He didn't lose interest at all and rolled all the cookies for me!


And then guess what? He wanted to clean up! Yes, Trevor voluntarily said he wanted to clean the bowls. Go for it Trevor! You are a big helper!


As you can see we were busy baking!!!!
Hope you had a great Easter!

Thursday, April 21, 2011

Bunny Ear Topper Cupcakes

I was inspired again by The Sweet Adventures of Sugarbelle and had to try these very cool cupcakes. A lot of work and pre-planning but I couldn't resist especially since it also involved cookies!

The first step - making bunny ear toppers. Not too hard and was able to make these ahead of time. I'm not that fond of making cupcakes since they require the night before prep....I prefer to be able to do things in advance.

To be a topper I put a little icing on the back of the cookie and iced a popsicle stick to them.
Next step was baking the Yummy, Yummy chocolate cupcakes. Nice and rich. I used a recipe I got from the back of my Hello, Cupcake book by Karen Tack & Alan Richardson. It's a fabulous book and I would recommend it to anyone! Some good recipes in the back and lots of fun cupcake ideas in them. They have a very cool blog too. This the book that my parents gave me that actually got me into baking! I used the cupcake frosting recipe out of the same book...boy, I remember why I don't make cupcakes too much! Cupcake frosting is so messy and so buttery! Wow. 3 sticks of butter. When cleaning up butter doesn't want to come off - all over my counter, my hands, my supplies. For me cupcake frosting is much harder to work with than cookie icing. But I think my Bunny Rabbits turned out pretty cute. After putting the frosting on I put the bunny ear toppers in the cupcakes, added eyes and a nose. I hand cut out the cupcake wraps. Last but not least - added bunny tails to the back! Then I packaged them up for Trevor's school friends so each classmate could take a cupcake home as a special treat.

HIPPITY HOPPITY LOOK AT EASTER COME!


HAPPY EASTER

Saturday, April 16, 2011

Spring Cookies

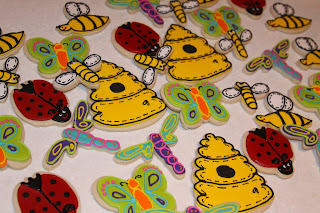
Another Spring order. Like I said, the lady bugs have been popular this year! The bee was a new cookie for me to decorate. This first assortment was for a "bug" day at a children's school with the bees, ladybugs, butterflies and dragon flies.


BZZZZZZ.....


Hope you are enjoying the spring weather today! It is a nice one here in KC!

Saturday, April 9, 2011

NOT SO GREAT ADVENTURES

Tried my hand at a few other things besides sugar cookies! I usually find an excuse to do this when we are having company or going someplace....Soooo since we had plans this weekend I had a few things brewing in my mind...here are the results - the good, the bad and the ugly.

Home made Graham crackers? Sounds yummy to me. When I get daily blog updates from so many wonderful cooks, I am tempted all too often to try to bake something different. I couldn't resist trying these. Would they be hard? What would they taste like? The taste was actually pretty much like a graham cracker and yummy. I just made mine a tad softer since I'm not a fan of "too done" cookies. The dough was rather interesting to work with. Not all that easy to roll out but I made it work. Here is the recipe I found on an excellent blog....HERE.

My little taste tester sure enjoyed them and me too!


I believe Trevor is going to turn into a PEEP lately. He eats so many of them and we have every color in our house. Did you know they make chocolate mousse PEEPS? I didn't either. I got the brilliant idea to try to make my own PEEPS after searching the internet and finding THIS recipe.
Here is what I was going for....our array of PEEPS we have at home.


A very involved recipe that I read about 5 or 6 times before starting to make sure I knew what I was doing. And several things going on at once. Here we have my gelatin over bowl of water to dissolve....
At the same time here is my corn syrup and sugar mixture boiling to 260 degrees......
The next step was putting the first 2 in the mix master with the fluffy egg whites. Things were looking pretty good until this stage. I was pouring it in and as you can see the corn syrup mixture decided to wrap all the way around the paddle attachment of the mix master. Wow.....it was the messiest thing ever and once I was done I wasn't sure I was ever going to get all that off. From there is all went down hill. I did get all the mixture in the bowl and it LOOKED okay still....the next step was to put it all in the icing bag - and here's where it just sounded simple, pipe those like I would do cookies into the peep shape. Well, let's just say it was too sticky, wouldn't even go in the bag. So I ended up with PEEP blobs.


Above are my blobs. I hated to just toss them out because they did seem to be marshmallow texture so I let the set and then let Trevor be my taste tester. He really liked them so they must taste like marshmallows. I'm not a marshmallow fan so I didn't even try them. All I know is that I won't be making those again. Not worth it!!! LOL But a girl had to try, right? That's why I call them my baking adventures!

So on to the the Key Lime pie. I made this the night before we were going to dinner out. It was a bit more involved than I had anticipated but not difficult at all. I searched high and low for a key lime pie recipe and really wanted one with ice cream. I only found one that didn't call for an ice cream maker. It was Mrs. Butter's Key Lime Pie. How could you go wrong with Mrs. Butter, right? Although it took some time to do this, it was relatively easy. The only tricky part was browning. After making the pie and the meringue topping directions tell you to put it in the oven until it browns. Not really saying how long. Below you can see it looks all browned, right? I think it was in there for about 15 minutes.

I thought I had success, pulled it out and went to bed. But I got to thinking about it and woke up really early on Saturday. I for some reason felt I should try to see if it would come out of the pan and just cut it in pieces before taking it someplace. The worst would be if I couldn't get it out when I got there!!! It came out of the bottom okay, but this was the only piece, (well, there may have been one more) that turned out presentable. Most of the pieces, sunk in the middle and didn't come out perfect like this. WELL...I can't take that I thought no matter what it tastes like so......

In a panic, found a recipe that I had all the ingredients for when I woke up early that AM. French Silk Pie. Made a graham cracker crust. These were both pretty easy to do and turned out nicely.

Here's the finished French Silk Pie. I had planned on taking a picture of it when I cut it up at dinner but I totally forgot! So this is all I have. But this came out nicely from the bottom and set up well.

The verdicts? BOTH WERE GOOD!!! LOL.
Everyone wanted the French Silk pie and really liked it. It was very chocolatey and I don't think I would add the extra bit of chocolate that I did just to be on the safe side. I tasted a few bites and it was just like Tippin's French Silk Pie if you remember those. I'm not a chocolate fan but the group loved it. I also made them try the key lime pie because I did take a few pieces over there as well. And they liked it too. I LOVED the key lime pie. It was wonderful in my opinion but then I"m an ice cream lover. So I guess in my panic I didn't really need to make the French Silk.....but oh well!


Thursday, April 7, 2011

Spring is Here!


I've been done a bit of baking this week. Haven't been able to post some of it because they are for a surprise for a few people. But here is what I can show you.

I think Ladybugs are going to be quite a hit this year.....here is already another batch of them for a birthday party. And I have 2 more with them as well! I should be pretty good by the end of Spring, don't you think?
Flowers to go with the ladybugs. I saw the combination of the ladybugs with these flowers on a blog....I thought they looked really nice together with the different colors and decided to try my hand at them. I wish I could remember which blog though! I'm not sure which one now and want to give them credit....dang it! Anyway, this is my version. Along with the ones I already I decided to add just one more design to this order. Fun dragonflies. My first time making them and they were fun to create. There are so many colors I could use. The hard part is actually deciding which colors and narrowing it down. The more colors, the longer it takes! And finally here are all the cookies together. A pretty good assortment if I do say so myself! I hope they enjoy them at the Birthday party!

Saturday, April 2, 2011


I've been wanting to try a chocolate chip sugar cookie for awhile....found the perfect occassion and the perfect recipe. From Karen's Cookies, HERE. I tasted this and it was just perfect....not too chocolatey but sweet enough. And I wondered how they would cook up and look once they were iced. As you can see they did good!

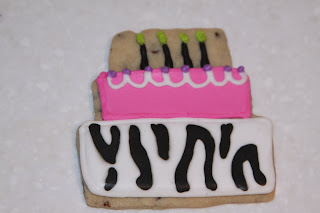
Some girlfriends of mine that are wild about my cookies have upcoming Birthdays. When I saw the idea for zebra print on my favorite blog I knew I had the perfect opportunity to try something new. The zebra print was pretty cool with Sugarbelle did it HERE. I watched her video tutorial and studied her pictures, thinking to myself this looks easier than it is going to be! I was right and this will take more practice on my part. But it was fun and I don't think it turned out too bad for my first attempt. Can you sort of see the zebra print going on here?
I got a few new cookies cutters and tried several of them out here. They were fun to use! My new Birthday cake cookie cutter.
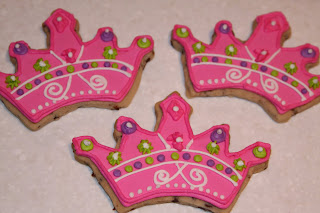
Tiara's for my Princess friends!
There are so many possibilities I have with this purse cookie cutter!

Party hats!
I thought the dresses were cute and girly!
How old will they be? Hmmm...not sure but I know they are younger than me! Sigh...One friend is having her 3rd anniversary of her 25th Birthday I believe. She is stopping at 25 according to her! A good plan in my opinion.
I've used the shoe cookie cutter before but I think I found some cute details for these.
And here is the whole lot of my Zebra print inspired cookies. Always fun to step outside my box and try a few things!!!


Happy Birthday to my friends! Hope you enjoy the cookies!